컴포즈에서 폰트 + 타이포그래피를 커스텀해보자
쉬운 방법부터 Jetpack Compose 가 권장하는 사용법까지...
순서
- 텍스트 스타일 인라인 지정
- FontFamily
- Material 제공 Typography
- Material 상속, Custom typography
예시로 사용한 노토산스 폰트는 웨이트별로 아래 링크에서 다운받을 수 있다.
https://fonts.google.com/noto/specimen/Noto+Sans+KR
Noto Sans Korean - Google Fonts
Noto is a global font collection for writing in all modern and ancient languages. Noto Sans KR is an unmodulated (“sans serif”) design for the Korean language u
fonts.google.com

1. 텍스트 스타일 인라인 지정
가장 간단한 방법
폰트 리소스를 추가하고
텍스트 스타일 필드에서 손수 지정한다.
@Composable
fun SimpleTextStyle() {
    Text(
        text = "simple text style",
        fontStyle = FontStyle(R.font.noto_sans_kr_regular),
        fontSize = 20.sp,
    )
}
2. FontFamily
여러 폰트 리소스를 폰트 패밀리로 묶고 사용하기!
폰트 패밀리 선언
val NotoSans = FontFamily(
    Font(R.font.noto_sans_kr_regular, FontWeight.Normal),
    Font(R.font.noto_sans_kr_medium, FontWeight.Medium),
    Font(R.font.noto_sans_kr_bold, FontWeight.Bold),
)
폰트 패밀리 사용예
@Composable
fun FontFamilyText() {
    Column {
        Text(
            text = "font family regular",
            fontFamily = NotoSans,
            fontWeight = FontWeight.Normal,
        )
        Text(
            text = "font family medium",
            fontFamily = NotoSans,
            fontWeight = FontWeight.Medium,
        )
        Text(
            text = "font family bold",
            fontFamily = NotoSans,
            fontWeight = FontWeight.Bold,
        )
    }
}
폰트 패밀리를 불러오는 부분이 훨씬 간단해졌다.
Text 의 다른 필드들을 이용해 size, color 등을 지정할 수 있다.
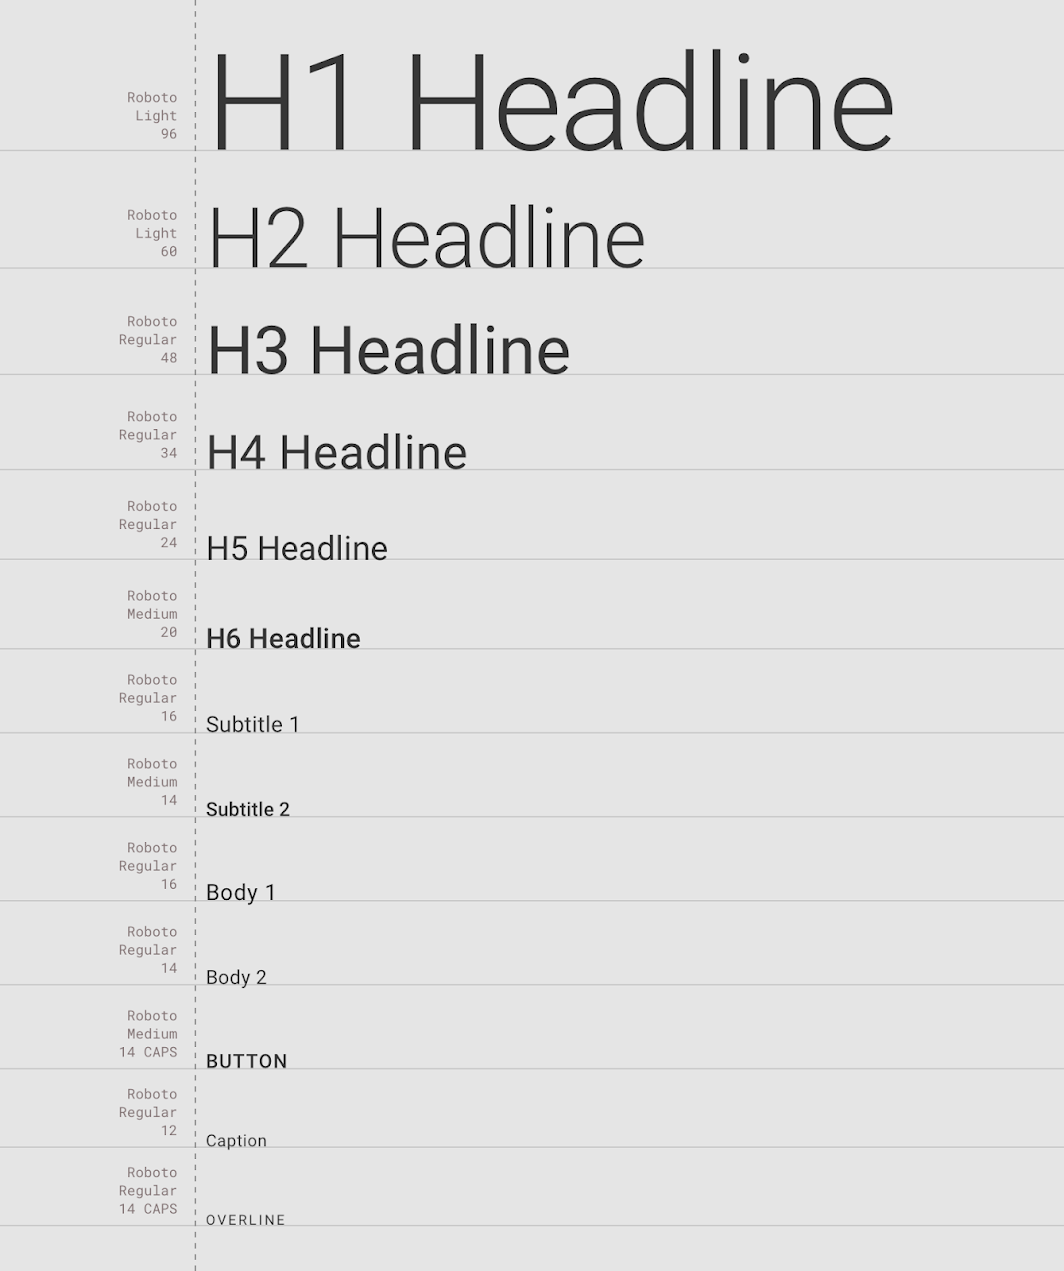
3. Material 제공 Typography
구글이 간편한 디자인을 위해 제공하는 Material Theme 을 사용하고있다면 미리 선언 된 타이포그래피를 사용할 수 있다.
미리보기...
주의) 최상위 스크린을 MaterailTheme 으로 감싸주어야 제대로 된 결과물을 볼 수 있다.
(여기서는 프리뷰를 MaterialTheme 으로 감싸주었음)
@Composable
fun MaterialTypo() {
    Column {
        Text(
            text = "material text h4",
            style = MaterialTheme.typography.h4
        )
        Text(
            text = "material text body1",
            style = MaterialTheme.typography.body1
        )
    }
}

@Preview(showBackground = true)
@Composable
fun PreviewMaterial() {
    MaterialTheme { // 잊지말자앗
        Column(
            modifier = Modifier.padding(10.dp),
            verticalArrangement = Arrangement.spacedBy(10.dp)
        ) {
            MaterialTypo()
        }
    }
}
4. Material 상속, Custom typography
그러나 주어진 타이포그래피 안에서만 디자인이 나올리가 없다
개발자가 스스로 타이포를 선언해서 비슷한걸 묶어쓸수도 있겠고, 디자인단에서 정의 된 타이포가 내려올 수도 있겠지
이를위해 나는 Material 을 상속하는 Custom Theme 을 선언하고
타이포그라피 객체는 커스텀을 사용했다.
또한 타이포그래피는 내용이 바뀔 일 없는 객체이므로 CompositionLocalProvider 로 감싸주었다.
타이포그래피 선언하기
https://developer.android.com/jetpack/compose/designsystems/material3#defining_typography
Material Design 3 in Compose | Jetpack Compose | Android Developers
Material Design 3 in Compose Stay organized with collections Save and categorize content based on your preferences. Jetpack Compose offers an implementation of Material Design 3, the next evolution of Material Design. Material 3 includes updated theming, c
developer.android.com
추가설명
https://developer.android.com/jetpack/compose/compositionlocal?hl=ko#intro
CompositionLocal을 사용한 로컬 범위 지정 데이터 | Jetpack Compose | Android Developers
CompositionLocal을 사용한 로컬 범위 지정 데이터 컬렉션을 사용해 정리하기 내 환경설정을 기준으로 콘텐츠를 저장하고 분류하세요. CompositionLocal은 암시적으로 컴포지션을 통해 데이터를 전달하
developer.android.com
val LocalReplacementTypo = staticCompositionLocalOf {
    HolsuiTypography()
}

@Composable
fun MyTheme(content: @Composable () -> Unit) {
    CompositionLocalProvider(
        LocalReplacementTypo provides myTypography
    ) {
        MaterialTheme(
            content = content,
        )
    }
}

object MyTheme {
    val typography: HolsuiTypography
        @Composable
        get() = LocalReplacementTypo.current
}
Typo Data class
@Immutable
data class HolsuiTypography(
    val myTypo2: TextStyle = TextStyle.Default,
    val myTypo1: TextStyle = TextStyle.Default,
    )

val fontFamily = FontFamily(
    listOf(
        Font(R.font.noto_sans_kr_regular, weight = FontWeight.Normal),
        Font(R.font.noto_sans_kr_medium, weight = FontWeight.Medium),
        Font(R.font.noto_sans_kr_bold, weight = FontWeight.Bold),
    )
)

internal val myTypography = HolsuiTypography(
      defaultFontFamily = fontFamily,
      myTypo2 = TextStyle(
        fontFamily = fontFamily,
        platformStyle = platformTextStyle,
        fontSize = 14.sp,
        lineHeight = 18.sp,
        fontWeight = FontWeight.Normal
    ),
    myTypo1 = TextStyle(
        fontFamily = fontFamily,
        platformStyle = platformTextStyle,
        fontSize = 24.sp,
        lineHeight = 34.sp,
        fontWeight = FontWeight.Medium
    ),
)
사용할 때
주의) 얘도 최상위 스크린을 MyTheme 으로 잘 감싸주자
@Composable
fun CustomTypo() {
    Column {
        Text(
            text = "custom text my typo1",
            style = MyTheme.typography.myTypo1
        )
        Text(
            text = "custom text my typo2",
            style = MyTheme.typography.myTypo2
        )
    }
}

@Preview(showBackground = true)
@Composable
fun PreviewCustomTheme() {
    MyTheme { // 이거 빠지면 도로묵
        Column(
            modifier = Modifier.padding(10.dp),
            verticalArrangement = Arrangement.spacedBy(10.dp)
        ) {
            CustomTypo()
        }
    }
}
처음에는 조금 번거로우나 성능에도 좋고 유지보수도 편하다!
잘못된 내용이나 개선점 댓글로 알려주시면 감사드리겠슴다.